Paper-writing guide, part 4: writing results and discussion that work
Finish your figures first, then let the Results walk readers through every one. Learn how to build a Discussion that answers "So what?", pick the right tense and close with purpose.
Every student who writes a paper reaches the same moment. The figures are drawn, the captions are written, and the question becomes: "Now what am I supposed to write?" The honest answer is that the real writing starts here, with a Results section that puts your figures into words and a Discussion that explains what they mean.
This is where many students stall. "Do I really have to describe all of this again in the text?" "What exactly goes in the Discussion?" This fourth part of CRI's seven-part paper-writing guide answers both: how to build the text around your figures, what each section is for and how to structure it, and the small details that separate a finished draft from a good one.
Settle your figures before you write
Many students write a paper in the order it will be read: introduction, then methods, then results. The more efficient approach is to settle your figures first.
A paper, in the end, reports what you discovered and how you proved it, and your figures, which visualize the results, are the most direct and powerful evidence you have. That is why professors often tell students, "Once the figures are done, 80 percent of the paper is done." With the figures in place, you can see what data each one holds and what conclusions it supports. All that remains is to explain them. (Part 3 of this series covers how to design them.)
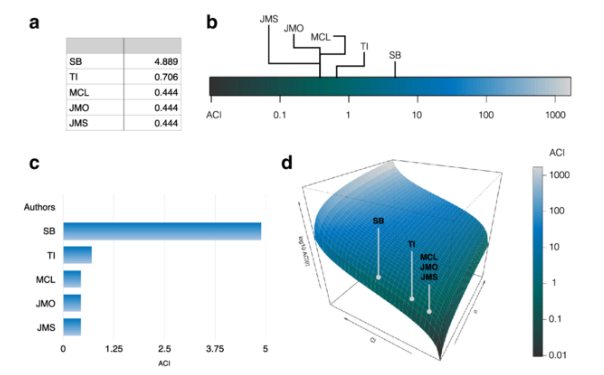
A multipanel figure. Every panel, from the table in (a) to the surface plot in (d), holds data the Results text has to walk readers through.
Settling the figures first also gives the whole paper its logical structure. You start from your conclusion, choose the results that demonstrate it best and write the text to match. The two sections then split the work:
Results
Discussion
Have a question you want to investigate?
Explore our faculty-guided programs, or tell admissions what you are curious about.
Explain the data in your figures step by step, leaving nothing out
Logically interpret what those results mean
Covers
Numbers, trends, differences, experimental conditions, comparison with published data
Meaning, what the results add to earlier research, limitations, next steps
Results: put everything in the figures into words
The Results section is the core of the paper, and it runs on one principle: explain all the data in your figures, completely and logically.
Describe every result, even the obvious ones. Some numbers or graphs will seem too self-evident to mention. Mention them anyway. Whoever reads your paper is meeting your experiments for the first time, so never assume a figure speaks for itself:
If a figure contains numbers, report them quantitatively in the text.
If it contains a graph, spell out the trend or the size of the difference.
Equations and experimental conditions belong in the text too, not only in the figure.
Assume the reader knows nothing. You have worked on these experiments for a long time, so the content feels obvious to you. Your reader may come from a completely different background, and "they'll know this much" is a dangerous assumption. Write as plainly as you can, move step by step so the explanation never jumps, and picture the questions a reader will ask so you can answer them first.
Give each paragraph one message. A Results section is a series of paragraphs, and each should carry a single experiment or a single idea. A typical sequence might run:
The purpose of the experiment and its key result
A summary of the method and the numbers it produced
The results of the control experiment
A comparison with published literature
Within each paragraph, lead with the point:
Position
What it does
First sentence
States the summary or claim
Middle sentences
Give the explanation, evidence and numbers
Last sentence
Reinforces the point or bridges to the next paragraph
Explain it the way you would to your roommate. The single best tip for this section is to imagine telling a friend about your results. You would say something like: "We ran an experiment. Here's how we did it. We got these values. They line up with earlier work, too. So here's what we can conclude." That sequence is the structure of a well-written Results section.
Discussion: answer "So what?"
If the Results describe what happened, the Discussion explains why it matters and what it means. This is where you answer the question every reader eventually asks: "So why is this important?"
Interpret, don't list. A list of results does not make a paper. You need to explain, analytically and logically, what the results mean, why they are interesting and what they add to existing research. Sentences like these do that work:
"The results shown in Figure 2 are consistent with existing theory X."
"This result overcomes the limitation noted in previous literature [Ref]."
"We show that the new analytical technique also applies meaningfully to Experiment B."
Back every claim with evidence. A Discussion is not a collection of impressions; it is a series of logical arguments. For each one, work in three steps: state the claim clearly in a single sentence, present the evidence behind it (experimental results, literature, numbers), then sum up what it means. Repeated claim by claim, this pattern is what gives the whole argument its force.
One paragraph, one claim, one line of reasoning. Paragraph structure matters here as much as in the Results. Keep each paragraph to a single claim and let the logic carry naturally into the next. A good paragraph moves through four beats: claim, evidence, interpretation, and then a conclusion or a limitation.
Be confident without overstating. You do need to explain why your results matter, but exaggeration and unsupported assertions cost you the reader's trust. Avoid phrases like "world first," and choose careful wording such as suggest, indicate and may contribute to over flat declarations. Don't retreat into a timid summary, either: say plainly in what context your finding is meaningful.
End with a way forward. The last paragraph of a Discussion usually sums up the study, acknowledges its limitations (sample size, analysis conditions, time and so on) and proposes follow-up research or the impact you expect. That sequence pulls the paper's message together and makes it persuasive; the final section below looks at each step in detail.
Two ways to combine Results and Discussion
Once the figures are organized and the results interpreted, one task remains: deciding how to fit the two sections together. This is more than alternating result and interpretation. The arrangement is a strategic choice that shapes how the entire paper reads.
Interleaved
Separate
Order
Result A, Discussion A, Result B, Discussion B
All the results, then all the discussion
How it works
Each result is interpreted right after it is presented
Every experiment is presented first, and their meaning is analyzed together
Strengths and trade-offs
The most natural and common approach; it lowers the reader's cognitive load and keeps them engaged
With a strongly designed logical structure it can be even more persuasive, though readers can lose their bearings partway through
Best for
Results that stand largely on their own
Complex mechanisms, or papers where comparing experiments is central
In an interleaved paper, you might describe a particular pattern in Figure 1 and explain right away why it matters, then confirm a new result in Figure 2 and move straight on to how it connects with earlier studies.
To choose between them, ask three questions:
Are your results largely independent of one another? Interleaving usually works better.
Are they steps toward proving a single, connected mechanism? Keeping the sections separate usually works better.
Along which route does your argument reach its core claim more naturally? Let that flow make the final call.
The details that decide quality
"I've written the results and the interpretation, but did I do it right?" It is one of the questions first-time authors ask most. In the Results and Discussion, quality often comes down to small details, and these are the ones students most often get wrong.
Past tense or present?
What the sentence covers
Tense
Example
Your own findings
Present
"These results suggest that…"
Details of specific experiments
Past
"We observed an increase in activity."
Previous literature
Past
"Smith et al. reported a similar trend."
Universal facts and formulas
Present
"ATP functions as an energy carrier."
The logic is simple. Summaries and interpretations of your results are what the paper claims now, so they take the present tense. How you ran the experiments and what you observed happened in the past, so they take the past tense.
Emphasize firmly, hedge politely. A clear finding can be stressed, and stressed again, with phrases such as "consistently observed" or "robustly replicated." When the interpretation is uncertain or the sample is small, soften it: "may indicate," "potentially associated." The goal is language that earns trust without exaggerating.
Match figures and text one to one. Every piece of data in Figure 2 should be mentioned directly somewhere in the Results text, including the numbers, the conditions and the comparison groups. Use phrases such as "As shown in Figure 2…" to make the connection natural. The text is written around the figures, never the other way around.
Three things your closing paragraph must do
After a long stretch of Results and Discussion, the final paragraph restates the paper's message and leaves a lasting impression. It can decide whether a reader remembers your paper as a good read or as a little vague. Make sure it does these three things.
1. Summarize clearly what the study found. In one or two sentences, restate the paper's core contribution in a confident, conclusive tone:
"The main finding of this study is…"
"We show that mechanism XX operates under condition YY."
"These results differ from previous study ZZ in the following ways."
2. Name the limitations instead of hiding them. Acknowledging limits shows scholarly humility, and it naturally sets up why follow-up work is needed and where it should go:
"Because this study was conducted only under condition A, caution is needed in generalizing the findings to situation B."
"Variable C was not analyzed directly, which calls for further research."
3. Propose the next question. Point to where the work could go from here:
"Future work could extend experiment X to a wider range of conditions."
"Building on these results, applications to disease Y could be explored."
"Longer-term effects and the underlying molecular mechanism remain to be investigated."
That last step is more than a sign-off. It tells the reader that the research is not an ending but a beginning.
A paper is, above all, writing meant to persuade, and the Results and Discussion are its heart: the place where you show what data you obtained and why it is meaningful and new. Put these strategies to work, and you will write something that fits the structure and purpose of a paper instead of reading like a lab report.
The paper-writing guide series
Why write a research paper at all?
Decide what you'll say before you decide how to start
Figures are the face of your paper
Writing results and discussion that work (this part)
When and how to write the introduction and abstract
Finding, citing and managing your sources
Proofreading, the final design step
You can find every part on the CRI blog. Next comes part 5, on the introduction and abstract.
Students in CRI's 1-on-1 Advanced Research Program go through this process with a faculty mentor over several months: settling the figures, drafting the Results and Discussion in English and revising until the manuscript is ready for journal submission.